Chủ Nhật, 20 tháng 1, 2013

Kích hoạt file .htaccess Apache2 trong Ubuntu


Để kích hoạt file .htaccess trong Ubuntu (và các hệ điều hành dựa trên Debidan) các bạn gõ:
sudo gedit /etc/apache2/sites-available/default
Kéo xuống, cho tới khi bạn nhìn thấy <Directory /home/user/public_html/>, hãy thay đổi AllowOverride None thành AllowOverride All:
apacheubuntu   05 Cài đặt và cấu hình Apache trong Ubuntu
Lưu file này lại và restart apache bằng lệnh sau:
sudo /etc/init.d/apache2 restart
Đến đây bạn mới kích hoạt được file .htaccess nhưng chưa dùng được mod_rewrite, bạn phải enable mod này bằng lệnh sau:
sudo a2enmod rewrite
Rồi, để mod này hoạt động bạn phải restart lại apache (lệnh đã giới thiệu ở trên rồi nhé :D ).
Bây giờ bạn hãy tạo thử file .htaccess trong thư mục test để thử xem, file .htaccess có nội dung như sau:
Options +FollowSymLinks
RewriteEngine On
RewriteBase /
RewriteRule (.*) http://google.com/$1 [R=301,L]
Sau đó mở trình duyệt và gõ http://localhost/test xem có chuyển sang Google không nhé :) )
Source:

Thứ Tư, 16 tháng 1, 2013

CONKY COLLECTION FOR UBUNTU/LINUX MINT/FEDORA/OPENSUSE/OTHER DISTRO'S


Conky Collection for Ubuntu 12.10 Quantal Quetzal/Ubuntu 12.04 Precise Pangolin/Ubuntu 11.10 Oneiric/Any Ubuntu Version/Linux Mint/Fedora/Other Linux Distro's
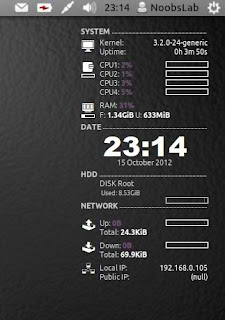
Now a day's conky gadgets are almost going down, Few guys are working on Conky gadgets. So NoobsLab decided to keep this work up for Linux guys. NoobsLab make available conky for all Linux environments like: Unity, Gnome Shell, Cinnamon, Mate, Gnome Classic and others.

Bar-Conky for Ubuntu/Mint/Fedora/Other Linux Distro's New
Nadia-Conky for Ubuntu/Mint/Fedora/Other Linux Distro's
HGM-Hudnet-Conky for Ubuntu/Mint/Fedora/Other Linux Distro's
123-Conky for Ubuntu/Mint/Fedora/Other Linux Distro's
Linux-Conky for Ubuntu/Mint/Fedora/Other Linux Distro's
Techno-Conky for Ubuntu/Mint/Fedora/Other Linux Distro's
1st-Conky for Ubuntu/Mint/Fedora/Other Linux Distro's
Colors-Conky for Ubuntu/Mint/Fedora/Other Linux Distro's
Legacy Conky for Ubuntu/Mint/Fedora/Other Linux Distro's
Lunatico Rings Conky for Ubuntu/Mint/Fedora/Other Linux Distro's
Gotham Conky for Ubuntu/Mint/Fedora/Other Linux Distro's
Energreen Conky for Ubuntu/Mint/Fedora/Other Linux Distro's
DeadSpace Conky for Ubuntu/Mint/Fedora/Other Linux Distro's
Reloj Conky for Ubuntu/Mint/Fedora/Other Linux Distro's
Two Conky for Ubuntu/Mint/Fedora/Other Linux Distro's
Tab Conky for Ubuntu/Mint/Fedora/Other Linux Distro's
Hardy Conky for Ubuntu/Mint/Fedora/Other Linux Distro's
Patch Conky for Ubuntu/Mint/Fedora/Other Linux Distro's
Lucid Conky for Ubuntu/Mint/Fedora/Other Linux Distro's
(Red, Gray, Orange) Conky in Ubuntu/Mint/Fedora/Other Linux Distro's
Sample Conky in Ubuntu/Mint/Fedora/Other Linux Distro's
Cores Conky in Ubuntu/Mint/Fedora/Other Linux Distro's
Infinity Conky in Ubuntu/Mint/Fedora/Other Linux Distro's Hot
Tron Conky in Ubuntu/Mint/Fedora/Other Linux Distro's
Lua Conky in Ubuntu/Mint/Fedora/Other Linux Distro's Hot


>>>Conky Installation<<<

Install Conky in Fedora open terminal and copy the following commands in the Terminal:
  • yum install conky

Install Conky in Ubuntu/Linux Mint open terminal (Press Ctrl+Alt+T) and copy the following commands in the Terminal:
  • sudo apt-get install conky conky-all

First of all Download Startup script with following commands:
  • wget -O .start-conky http://goo.gl/6RrEw
  • chmod +x .start-conky
Now open Startup Applications > click Add > New Dialog box will open click on Browse > Now (Press Ctrl+H) see following screenshot.

INSTALL UBUNTU-TWEAK 0.8.1 IN UBUNTU 12.10/12.04/11.10/LINUX MINT (NEW RELEASE)


Install Ubuntu-Tweak 0.8.1 in Ubuntu 12.10 Quantal/Ubuntu 12.04 Precise/Ubuntu 11.10/Linux Mint 13/12 (New Release) and old versions on previous Ubuntu versions.

Ubuntu Tweak is an application designed to config Ubuntu easier for everyone. It provided many useful desktop and system options that the default desktop environment isn't provided. At present, It is only designed for Ubuntu GNOME Desktop, and often follows the newest Ubuntu distribution.
ubuntu tweak

ubuntu tweak

ubuntu tweak
Apps in Ubuntu Tweak 0.8.1:
Open the Ubuntu Tweak 0.8.1, you will get the changes immediately, the “Apps” tab is the place where you will play with the apps, the apps that are not possible to install from Ubuntu Software Center, or not the latest version in Ubuntu Software Center.
When you enter the Apps tab, you will see the interface like this. Left side is the categories for app, and the right side is the app icons. Click the target category or app you want to operate, like “Google Chrome Stable” (The stable version of Google Chrome)
ubuntu tweak

Changelog of version 0.8.1:
  • Add Disable "Show Desktop" in the switcher (12.10 only)
  • Add the Apps shortcut to Unity launcher icon
  • QuickLists Editor support 12.10 and reordering the unity items
  • Add installation status in app view
  • Disable the Window tweaks for 12.10
  • Add cookie and cache (12.10 only) support for Apps
  • Bugs fixed: Increase the default window size to 900x506

To install Ubuntu-Tweak in Ubuntu/Linux Mint (Press Ctrl+Alt+T) and copy the following commands in the Terminal:
  • sudo add-apt-repository ppa:tualatrix/ppa 
  • sudo apt-get update
  • sudo apt-get install ubuntu-tweak
Ubuntu-Tweak 0.8.1 Package File.deb, Also Support Ubuntu-tweak Project by Donations.
That's it, Enjoy
Source: Ubuntu-Tweak

Thứ Ba, 15 tháng 1, 2013

MAC OS X LION THEME FOR UBUNTU 12.04/12.10/11.10 (2ND VERSION COMPLETED)


Install Mac OS X Lion Theme on Ubuntu 12.04/12.10/11.10/Linux Mint 13(2nd Version Completed) with two icon sets

Previous shared Mac OS X Lion Version 1 for Ubuntu, People liked this theme also we should thank to Author.
Many People Search for Macbuntu 12.04/Macbuntu 12.10/Macbuntu 11.10/Mac4lin, Mac Ubuntu theme and so on. So here we are ready with Mac OS X Lion Theme for Ubuntu 12.04 Precise Pangolin and Hopefully Mac Theme will work with Linux Mint 13.

>> Note Link: Mac Theme is Available for Ubuntu 12.10 Quantal/Linux Mint 14

macbuntu

mac ubuntu

What's new in 2nd Version?
  • Fix Many bugs in theme and icons
  • more smooth,shiny and fast
  • fix insensitive progress bar issue 
  • fix metacity buttons
  • fix color matching between top panel and window when maximized 
  • redesign toolbar buttons
  • added more roundness in toolbar
  • recoloured row colours
  • added hover effect on cells and row with slightly bold font effect
  • also hover on buttons have bold font effect
  • search bar and trash bar got both different colors
  • remove border from rubber band
  • remove border from floating bar

In 2nd Version Author provide 2 icon packs
Mac Lion Icons
ubuntu mac

Mac SnowLeopard Icons
mac theme

1: Download Mac OS X Lion Wallpapers

2: Install Latest Cairo Dock
Right Click on Cairo Dock > Select Launch CairoDock at Startup
mac wallpapers

3: Scroll Bars Setting: Install Ubuntu Tweak, Go to Miscellaneous and switch off Overlay Scrollbars
mac lion wallpapers

4: Install New Apple Logo in Launcher
mac apple logo
Enter following commands to install Apple Logo:
  • wget -O apple-logo.zip http://goo.gl/NZyKc
  • sudo unzip apple-logo.zip -d /usr/share/unity/5/
It will ask to replace file, Type "A" and Press enter
If you want back Ubuntu enter following commands in terminal:
  • wget -O ubuntu-logo.zip http://goo.gl/mU42p
  • sudo unzip ubuntu-logo.zip -d /usr/share/unity/5/
It will ask to replace file, Type "A" and Press enter

Now Theme Installation:

5: To Install Mac OS X Lion Theme and Icons on Ubuntu open Terminal (Press Ctrl+Alt+T) and copy the following commands in the Terminal:
  • sudo add-apt-repository ppa:noobslab/themes
  • Now Enter This Command then go to install commands
  • sudo apt-get update
  • Install Icons
  • sudo apt-get install mac-os-lion-icons-v2
  • Install Theme
  • sudo apt-get install mac-os-lion-theme-v2

Install Mac Cursors copy the following commands in the Terminal:
  • wget -O mac-cursors.zip http://goo.gl/eYtho
  • sudo unzip mac-cursors.zip -d /usr/share/icons/
  • sudo rm mac-cursors.zip
  • cd /usr/share/icons/mac-cursors
  • sudo chmod +x install-mac-cursors.sh uninstall-mac-cursors.sh
  • ./install-mac-cursors.sh
To Uninstall Cursors
  • cd /usr/share/icons/mac-cursors
  • ./uninstall-mac-cursors.sh

6: Disable Crash reports: 
Usually you noticed Ubuntu 12.04 crashes more than previous versions, so you can disable reports with following command:
  • sudo sed -i "s/enabled=1/enabled=0/g" '/etc/default/apport'

7: Install Compiz Setting Manager to Autohide Unity Launcher: 
  • sudo apt-get install compizconfig-settings-manager
unity autohide

8: Install Gnome Tweak Tool/Ubuntu Tweak to change Themes, Icons, Cursors: 
  • sudo apt-get install gnome-tweak-tool

Go here to Remove White Dots from Login Screen.
Say Thanks to Author

Khắc phục một số lỗi thường gặp khi cập nhật Ubuntu

Khi tiến hành cập nhật ứng dụng hay các bản vá cho hệ điều hành Ubuntu có thể bạn sẽ gặp một số thông báo lỗi không mong muốn, dẫn đến không thể tiếp tục quá trình. Dưới đây là các thông báo lỗi thường gặp và cách khắc phục 
 

1. E:Encountered a section with no Package: header, E: Problem with MergeList
 
 
Thỉnh thoảng khi chạy các bản cập nhật trong trình Update Manger bạn sẽ gặp thông báo lỗi sau 
Could not initialize the package information.
An unresolvable problem occurred while initializing the package information.
Please report this bug against the ‘update-manager’ package and include the following error message:
‘E:Encountered a section with no Package: header, E: Problem with MergeList /var/lib/apt/lists/archive.ubuntu.com_ubuntu_dists_natty_main_binary-amd64_Packages, E:The package lists or status file could not be parsed or opened.’

Hay một thông báo lỗi tương tự khi chạy dòng lệnh cập nhật apt-get update trong Terminal 
Reading package lists… Error!
E: Encountered a section with no Package: header
E: Problem with MergeList /var/lib/apt/lists/archive.ubuntu.com_ubuntu_dists_natty_main_binary-amd64_Packages
E: The package lists or status file could not be parsed or opened.

Để khắc phục hai lỗi trên bạn mở Terminal (Ctrl + Alt + T) và chạy các dòng lệnh sau 
sudo rm -rf /var/lib/apt/lists/* 
sudo apt-get clean 
sudo apt-get update
 

2.E: Could not get lock /var/lib/dpkg/lock – open (11: Resource temporarily unavailable)
 
 
Một lỗi rất thông dụng khác khi bạn cài đặt một ứng dụng hoặc một bản cập nhật 
E: Could not get lock /var/lib/dpkg/lock – open (11: Resource temporarily unavailable)
E: Unable to lock the administration directory (/var/lib/dpkg/), is another process using it?
Nguyên nhân gây ra lỗi này là do một tiến trình khác còn đang sử dụng gói dữ liệu hay thư mục cần để cài đặt ứng dụng thông qua Synaptic Package Manager, Update Manger, terminal hay Ubuntu Software Center. Để khắc phục lỗi này bạn tiến hành đóng các ứng dụng khác trong khi đang cài đặt hay cập nhật ứng dụng. Nếu không tìm thấy ứng dụng đang ngăn cản quá trình này, bạn chỉ chạy dòng lệnh sudo rm /var/lib/apt/lists/lock trong Terminal 
 

3.Require the installation of untrusted packages
 
 
Có các nguyên nhân thường gặp của thông báo lỗi the action would require the installation of packages from not authenticated sources


- Phần mềm bị hạn chế bởi bản quyền tác giả hoặc các vấn đề pháp lý (Software is restricted by copyright or legal issues
 
 
- Phần mềm từ các đối tác của hãng Canonical và chưa được thêm vào danh sách Source List (The Software is from Canonical Partner and has not been added to Source List) 
- Ứng dụng đã được cài đặt dưới dạng mã nguồn của nó (The application has been installed form its source code)
 
 
- Thiếu khóa công khai của ứng dụng (Missing public key of the application)
 
 
Nếu bạn chưa biết được nguyên nhân nào trong số trên gây ra lỗi, bạn làm theo các bước hướng dẫn sau: 
Lỗi Software is restricted by copyright or legal issues
 
 
Bạn chạy Update Manager và nhấn Settings như hình dưới 


Tại đây bạn chuyển sang thẻ Ubuntu Software và đánh dấu vào tùy chọn Software is restricted by copyright or legal issues. Bạn đóng các thiết lập và cài đặt lại ứng dụng 
 
 
Lỗi The Software is from Canonical Partner and has not been added to Source List
 
 
Cũng trong giao diện Update Manager Settings, bạn chuyển sang thẻ Other Software và đánh dấu vào hai tùy chọn Canonical PartnerCanonical Partner (Source Code)


Lỗi The application has been installed form its source code
 
 
Cũng trong giao diện Update Manager Settings, bạn chuyển sang thẻ Ubuntu Software và đánh dấu vào tùy chọn Source Code


Lỗi Missing public key of the application
 
 
Bạn mở giao diện Terminal và chạy dòng lệnh sau sudo apt-get update
Bạn chờ đợi đến khi hoàn tất và nếu thấy một thông báo đại loại như 
W: GPG error: http:/something.something Release: The following signatures couldn’t be verified because the public key is not available: NO_PUBKEY XXXXXXXXXXXXXXXX
Bạn hãy viết các con số sau phần NO_PUBKEY lên giấy. Lỗi này là do khóa công khai của ứng dụng chưa được thêm vào. Để khắc phục bạn vào Terminal và gõ vào dòng lệnh 
sudo apt-key adv --recv-key --keyserver keyserver.ubuntu.com XXXXXXXXXXXXXXXX 
Với XXXXXXXXXXXXXXXX là dãy số bạn đã viết lên giấy
 
 
Sau khi hoàn tất bạn chạy Terminal lần nữa và nhập vào dòng lệnh sudo apt-get update  để cập nhật ứng dụng. 


Source: http://xahoithongtin.com.vn/20111219012718812p0c252/khac-phuc-mot-so-loi-thuong-gap-khi-cap-nhat-ubuntu.htm