Thứ Ba, 25 tháng 2, 2014

How to start node.js on port 80 on a linux server?

iptables -t nat -A PREROUTING -p tcp --dport 80 -j REDIRECT --to-port 8000
iptables -t nat -A PREROUTING -p tcp --dport 80 -j REDIRECT --to-port 3000
sudo sh -c "iptables-save > /etc/iptables.rules"
pre-up iptables-restore < /etc/iptables.rules
1. sudo su
 2. iptables-save > /etc/iptables.rules
 3. In /etc/network/if-pre-up.d/iptables,put:

 #!/bin/sh
 iptables-restore < /etc/iptables.rules
 exit 0

 4. After, in /etc/network/if-post-down.d/iptables,put:
 #!/bin/sh
 iptables-save -c > /etc/iptables.rules
 if [ -f /etc/iptables.rules ]; then
 iptables-restore < /etc/iptables.rules
 fi
 exit 0
 5. After, give permission to the scripts:
 sudo chmod +x /etc/network/if-post-down.d/iptables
 sudo chmod +x /etc/network/if-pre-up.d/iptables

Enable Laptop Mode and other tweaks to improve Laptop battery

Enable Laptop Mode and other tweaks to improve battery for Ubuntu 13.10/13.04/12.10/12.04/10.04/Linux Mint 16/15/14/13/9and other related Ubuntu derivatives

Managing battery power in Linux since kernel 3.x is bit difficult, many users face quick battery drain in Linux than other operating systems. There are tools available to manage power of laptop to improve battery life, previously I wrote improve battery with TLP power management. Now I burought other tools for you to improve battery life, if TLP doesn't fit to your needs. This script does all tweaks automatically within your system.

First of all the most popular utility Laptop Mode Tools which saves power by spinning down hard drives, and in addition, it can be configured to tweak all sorts of other power-related things. The core feature of Laptop Mode Tools is that it controls the "laptop mode" feature of the Linux kernel. In addition this tools can tweak things like readahead settings, hard drive power management settings, CPU frequency scaling settings, CPU throttling settings, DPMS settings, terminal blanking settings, and LCD brightness settings. It also supports various other power management features, such as starting and stopping daemons depending on power mode, automatically hibernating if battery levels are too low, and adjusting terminal blanking and X11 screen blanking.
Second tweak is to stop access to HDD for log files. If you are in single user system, probably you don't need log file like when this directory/file was accessed last time.
Third tweak is about to create virtual ram (swappiness), so whenever ram is out of space system is going to use virtual ram. This allows system to use all memory when memory is full use virtual ram, so in this case system won't bother your HDD.
Forth tweak is about to create ram drive for temp filesystem. This tweak moves temporary files from HDD to RAM then system won't hit HDD for temp file. The system touches HDD the more we save battery.
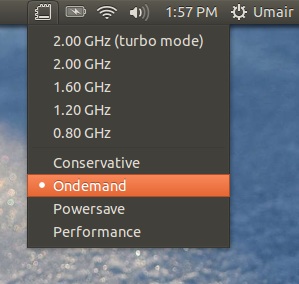
Fifth tweak is a utility called indicator-cpufrequency, It allows user to set specific amout of CPU to system or CPU on demand. In such a way it can help user to save battery by using 'power on demand'.
cpufreq

Download and run script for battery tweaks in Ubuntu 13.10/13.04/12.10/12.04/10.04/Linux Mint 16/15/14/13/and other related Ubuntu derivatives open terminal and enter following commands:


Use this one command to undo/uninstall tweaks open terminal and enter following command:


Dual GPU Tweak:
This tweak is only for those who has dual GPU in their Laptop. If you are not using other GPU for example Nvidia, AMD Catalyst, you can disable them in order to save battery.
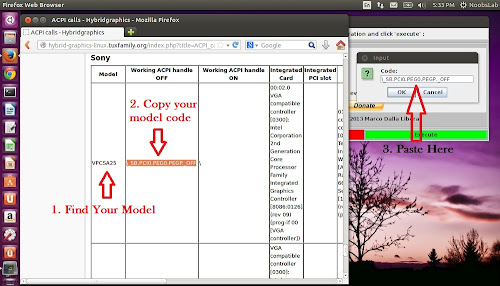
So there is an open source program written in java. It disables discrete GPU which is not in use to save battery time.
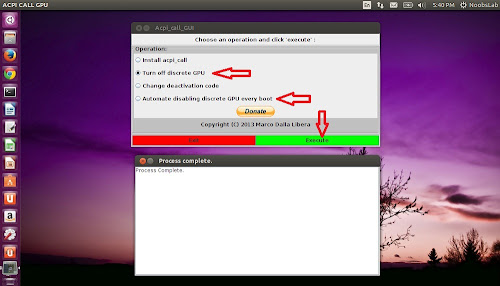
This is a java program that allows the user to simply install acpi_call kernel module via graphic Interface, and also provides an useful script that automatically recompiles the kernel after each update.

Program features:
  • Install the acpi_call kernel module (kernel would be recompiled automatically after each update).
  • Deactivate discrete GPU.
  • Automatically deactivate discrete GPU on every boot.

discrete gpu

discrete gpu

discrete gpu

Also see this video tutorial.

To install Acpi-Call-GPU Utility in Ubuntu/Linux Mint/other Ubuntu derivatives Open Terminal (Press Ctrl+Alt+T) and copy the following commands in the Terminal:


This program requires java installed on the system. That's it
http://www.noobslab.com/

How to Improve Laptop Power Management in Ubuntu/Linux Mint/and Ubuntu derivatives

Improve Laptop Power Management in Ubuntu 13.04 Raring/12.10 Quantal/12.04 Precise/10.04 Lucid/Linux Mint 15/14/13/and related Ubuntu derivatives

TLP is a power management tool for Linux. TLP is a pure command line tool with automated background tasks, It does not contain a GUI. It brings you the benefits of advanced power management without the need to understand every technical detail. TLP does not replace but enhance the existing power management of your Linux installation. TLP applies it's settings upon system startup and on every change of the power source.

Settings depending on the Power Source:
  • Kernel laptop mode and dirty buffer timeouts
  • Processor frequency scaling including "turbo boost" / "turbo core"
  • Power aware process scheduler for multi-core/hyper-threading
  • Hard disk advanced power magement level and spin down timeout (per disk)
  • SATA aggressive link power management (ALPM)
  • PCI Express active state power management (PCIe ASPM) – Linux 2.6.35 and above
  • Runtime power management for PCI(e) bus devices – Linux 2.6.35 and above
  • Radeon KMS power management – Linux 2.6.35 and above, not fglrx
  • Wifi power saving mode – depending on kernel/driver
  • Power off optical drive in drive bay (on battery)

Additional functions:
  • I/O scheduler (per disk)
  • USB autosuspend with blacklist
  • Audio power saving mode – hda_intel, ac97
  • Enable or disable integrated wifi, bluetooth or wwan devices upon system startup and shutdown
  • Restore radio device state on system startup (from previous shutdown).
  • Radio device wizard: switch radios upon network connect/disconnect and dock/undock
  • Disable Wake On LAN
  • WWAN state is restored after suspend/hibernate
  • Untervolting of Intel processors – requires kernel with PHC-Patch
  • Battery charge thresholds – ThinkPads only
  • Recalibrate battery – ThinkPads only

Every new Linux kernel brings improvements regarding laptop power management. TLP offers many power management benefits to Linuxbased laptops without any complicated instructions. Basically TLP doesn't replace any existing power management in Linux but it improves current power management.

To install TLP in Ubuntu/Linux Mint open Terminal (Press Ctrl+Alt+T) and copy the following commands in the Terminal:


If you are using IBM Thinkpad then use following command to install (first add above PPA):


To start TLP service use following command:


To check if TLP service is working properly, use following command:


You will see such output:
 +++ System Status
 TLP power save = enabled
 power source = ...

Complete configuration instruction are available here.

TLP Settings

Contents

  1. General
  2. File System
  3. Processor and Frequency Scaling
  4. Kernel
  5. Undervolting
  6. Disks and Controllers
  7. PCI Express Bus
  8. Graphics Cards
  9. Networking
  10. Audio
  11. Drive Slot / Ultrabay
  12. Runtime Power Management
  13. USB
  14. System Start and Shutdown
  15. Wireless Radio Switch
  16. Battery Charge Thresholds
  17. Radio Device Wizard
  18. Links

Introduction

All TLP settings are stored in the config file /etc/default/tlp. The default configuration provides optimized power saving out of the box. Some advanced features like turning off the optical drive and battery thresholds need to be activated explicitly.
The config file can be changed with any text editor (root privilege is needed). For example:
gksudo gedit /etc/default/tlp
Changes to the settings take effect after a reboot, a change of the power source or directly by
sudo tlp start
Hint: when installing updates of TLP, the package manager asks for confirmation before overwriting a changed config file with an updated version.

Parameters

Power Saving

General hints:
  • Parameters ending on _AC are effective with the power supply connected
  • Parameters ending on _BAT are effective when running on battery
  • Parameters containing blanks must be enclosed in double quotes ("")
  • Some parameters are inactive by default; remove the leading '#' to activate

General

TLP_ENABLE=1
Set to 0 to disable TLP (Reboot needed).

File System

DISK_IDLE_SECS_ON_AC=0
DISK_IDLE_SECS_ON_BAT=2
Values > 0 activate kernel laptop mode. Do not change this setting.
MAX_LOST_WORK_SECS_ON_AC=15
MAX_LOST_WORK_SECS_ON_BAT=60
Timeout (in seconds) for writing unsaved data in file systems buffers to disk.

Processor and Frequency Scaling

CPU_SCALING_GOVERNOR_ON_AC=ondemand
CPU_SCALING_GOVERNOR_ON_BAT=ondemand
Selects the cpu scaling governor for automatic frequency scaling. Possible values are ondemand (default), powersave, performance and conservative.
intel_pstate: since kernel 3.9 the new scaling driver intel_pstate is available and enabled by default on Intel Sandy Bridge (or newer) hardware. intel_pstate supports the governors powersave (recommended default) and performance only. To determine the active scaling driver, refer to tlp-stat output, section "+++ Processor".
Important: to use this setting you must disable your distribution's governor settings or conflicts will occur. See the TLP FAQ.
CPU_SCALING_MIN_FREQ_ON_AC=0
CPU_SCALING_MAX_FREQ_ON_AC=0
CPU_SCALING_MIN_FREQ_ON_BAT=0
CPU_SCALING_MAX_FREQ_ON_BAT=0
Set the min/max frequency available for the scaling governor. Possible values depend on your CPU. For available frequencies consult the output of tlp-stat, section "+++ Processor". A value of 0 means to use processor defaults.
Hint: after enabling the processor defaults a restart is required to ensure that the new setting takes.
Important: lowering the max frequency on battery power does not conserve power. The best results are achieved by the ondemand governor without frequency limits.
CPU_BOOST_ON_AC=1
CPU_BOOST_ON_BAT=0
Disable cpu "turbo boost" (Intel) or "turbo core" (AMD) feature (0 = disable / 1 = allow).
Hints:
  • Requires Linux 3.7 and above
  • A value of 1 does not activate boosting, it just allows it
  • This may conflict with your distribution's governor settings
SCHED_POWERSAVE_ON_AC=0
SCHED_POWERSAVE_ON_BAT=1
Minimize number of used cpu cores/hyper-threads under light load conditions (1 = enabled, 0 = disabled). Depends on processor model.

Kernel

NMI_WATCHDOG=0
Activate kernel NMI watchdog timer (0 = disabled/save power, 1=enabled). A value of 1 is relevant for kernel debugging only.

Undervolting

Hint: advanced Linux skills are necessary to use this feature.
PHC_CONTROLS="F:V F:V F:V F:V"
Frequency/voltage ID pairs for the undervolting of Intel processors. Assumes that a kernel with PHC patches is installed. For more information see the PHC wiki.

Disks and Controllers

Device Assignment

DISK_DEVICES="sda sdb"
Defines the disk devices the following parameters are effective for. Multiple devices are separated with blanks.
When using a 2nd disk in a swappable drive slot or the Ultrabay, the assignment of device names by the kernel (sda/sdb) can change possibly. In this case it is advisable to do the device assignment using IDs:
DISK_DEVICES="ata-INTEL_SSDSA2M160G2GC_XZY123456890 ata-HITACHI_HTS541612J9SA00_XZY123456890"
The command
tlp diskid
shows the IDs of all attached disks.

Advanced Power Management

DISK_APM_LEVEL_ON_AC="254 254"
DISK_APM_LEVEL_ON_BAT="128 128"
Set the "Advanced Power Management Level". Possible values range between 1 and 255.
Some selected values are:
  • 1 – max power saving / minimum performance – Important: this setting may lead to increased disk drive wear and tear because of excessive read-write head unloading (recognizable from the clicking noises)
  • 128 – compromise between power saving and wear (TLP standard setting on battery)
  • 192 – prevents excessive head unloading of some HDDs
  • 254 – minimum power saving / max performance (TLP standard setting on ac)
  • 255 – disable APM (not supported by some disk models)
Different values for multiple disks are separated with blanks.

Spin Down

DISK_SPINDOWN_TIMEOUT_ON_AC="0 0"
DISK_SPINDOWN_TIMEOUT_ON_BAT="0 0"
Timeout value until the spindle motor stops when the disk is idle. Valid settings:
  • 0 – disabled
  • 1..240 – timeouts from 5 seconds to 20 minutes (in increments of 5 seconds)
  • 241..251 – timeouts from 30 minutes to 5.5 hours (in increments of 30 minutes)
Different values for multiple disks are separated with blanks.
SSDs don't have moving parts, therefore this setting is "don't care" for them and can remain disabled.
Hint: stopping the system disk for extended periods of time is unlikely to work, because applications and system daemons wake up the disk frequently. However for a 2nd disk in a swappable drive slot or the Ultrabay that is not accessed permanently, this setting may be quite useful.

Disk I/O Scheduler

DISK_IOSCHED="deadline cfq"
Sets the I/O scheduler per disk. Possible values:
  • cfq – Linux default, suggestion for both conventional HDDs and SSDs
  • deadline – alternative for SSDs
  • noop – alternative for SSD
Different values for multiple disks are separated with blanks.

SATA Aggressive Link Power Management

SATA_LINKPWR_ON_AC=max_performance
SATA_LINKPWR_ON_BAT=min_power
Sets the power management mode for the SATA links connecting disk and optical drives. Possible values:
  • min_power – max power saving / minimum performance
  • medium_power – compromise between power saving and performance
  • max_performance – minimum power saving / max performance

PCI Express Bus

Active State Power Management

PCIE_ASPM_ON_AC=performance
PCIE_ASPM_ON_BAT=powersave
Sets PCIe ASPM power saving mode. Available with kernel 2.6.35 and above. Possible values:
  • default
  • performance
  • powersave

Graphics Cards

Radeon (old)

RADEON_POWER_PROFILE_ON_AC=high
RADEON_POWER_PROFILE_ON_BAT=low
Controls the graphics card's clock. Available with kernel 2.6.35 and above. Supported by the radeon driver only, not fglrx. Possible values:
  • low
  • mid
  • high
  • auto – mid on battery, high on ac
  • default – uses hardware defaults, clock control disabled
Hint: this setting makes the display flicker briefly upon changing the power source.

Radeon DPM (new)

Since kernel 3.11 the new radeon dynamic power management (DPM) is available. Supported by the radeon driver only, not fglrx.
Hint: needs the kernel boot option radeon.dpm=1.
RADEON_DPM_STATE_ON_AC=performance
RADEON_DPM_STATE_ON_BAT=battery
Controls the power management method. Possible values:
  • battery – default on battery power
  • performance – default on ac power
RADEON_DPM_PERF_LEVEL_ON_AC=auto
RADEON_DPM_PERF_LEVEL_ON_BAT=auto
Controls the performance level. Possible values:
  • auto – recommended!
  • low
  • high

Networking

Wifi Power Management

WIFI_PWR_ON_AC=1
WIFI_PWR_ON_BAT=5
Sets wifi power saving mode. Adapter support depends on kernel and driver. Possible values:
  • 1 – disabled
  • 5 – enabled
Hint: power save can cause an unstable wifi link.

Wake On LAN

WOL_DISABLE=Y
  • Y – Wake on LAN disabled
  • N – Wake on LAN enabled
Hint: after enabling a restart is required to ensure that the new setting takes.

Audio

SOUND_POWER_SAVE=1
Timeout (in seconds) for the audio power saving mode (supports Intel HDA, AC97). A value of 0 disables power save.
Hint: this setting can cause slight clicks in sound output.
SOUND_POWER_SAVE_CONTROLLER=Y
  • Y – powers off the controller together with the sound chip
  • N – controller active permanently

Drive Slot / Ultrabay

BAY_POWEROFF_ON_BAT=0
  • 1 – power off the optical drive on battery
  • 0 – optical drive powered on permanently
BAY_DEVICE=sr0
Device file for the optical drive (default: /dev/sr0).
Hints:
  • Re-power the drive by releasing and reinserting the drive slot/Ultrabay eject lever; on newer models push the media eject button
  • Devices other than optical drives – in particular hard disk drives – are not affected by this setting

Runtime Power Management

RUNTIME_PM_ON_AC=on
RUNTIME_PM_ON_BAT=auto
Controls runtime power management for PCI(e) bus devices. Available with kernel 2.6.35 and above. Possible values:
  • auto – enabled (power down idle devices)
  • on – disabled (devices powered on permanently)
RUNTIME_PM_ALL=0
Controls which PCI(e) devices are considered for runtime power management:
  • 0 – only selected devices (safe default)
  • 1 – all devices (experimental)
Warning: RUNTIME_PM_ALL=1 is an experimental feature, it may cause problems with reboot and shutdown.
RUNTIME_PM_BLACKLIST="00:12.3 00:45.6"
Exclude listed pci(e) device addresses from runtime power management. Use lspci to lookup the addresses (first column).

USB

USB_AUTOSUSPEND=1
Set autosuspend mode for all USB devices upon system start or a change of power source. Input devices like mice and keyboards are exluded by default. Possible values:
  • 1 – enable
  • 0 – disable
USB_BLACKLIST="1111:2222 3333:4444"
Exclude USB devices from autosuspend mode. Useful for devices having difficulties in waking up from autosuspend. Use lsusb to determine IDs. Multiple IDs are separated with blanks.
USB_BLACKLIST_WWAN=1
Exclude builtin wwan devices from autosuspend mode:
  • 0 – do not exclude
  • 1 – exclude
Note: currently works for USB IDs 05c6:* (Qualcomm), 0bdb:* (Ericsson) and 1199:* (Sierra) only.
USB_AUTOSUSPEND_DISABLE_ON_SHUTDOWN=1
Disables USB autosuspend mode upon system shutdown. This is intended as a workaround if suspended USB devices disturb the shutdown process.

System Start and Shutdown

RESTORE_DEVICE_STATE_ON_STARTUP=0
Restores radio device state (builtin bluetooth, wifi, wwan) from previous shutdown on system startup:
  • 0 – disable
  • 1 – enable
Hint: the parameters DEVICES_TO_DISABLE_ON_STARTUP/SHUTDOWN below are ignored when this is enabled.
DEVICES_TO_DISABLE_ON_STARTUP="bluetooth wifi wwan"
Disables builtin radio devices upon system start:
  • bluetooth
  • wifi – Wireless LAN
  • wwan – Wireless Wide Area Network (UMTS)
Multiple devices are separated with blanks.
Hint: this feature is not available for all laptops. It depends on rfkill support for your model.
DEVICES_TO_ENABLE_ON_STARTUP="bluetooth wifi wwan"
Linux enables all builtin radio devices by default. In case of exception you can use this setting to enable the missing devices upon system startup. Possible values are as above.
DEVICES_TO_DISABLE_ON_SHUTDOWN="bluetooth wifi wwan"
Disables builtin radio devices upon system shutdown. May be used as a workaround when enabled radio devices block the shutdown process. Possible values are as above.
DEVICES_TO_ENABLE_ON_SHUTDOWN="bluetooth wifi wwan"
Enables builtin radio devices upon system shutdown. May be used as a workaround to prevent other operating systems from missing disabled devices. Possible values are as above.

Wireless Radio Switch

ThinkPads / Ubuntu only
DEVICES_TO_ENABLE_ON_RADIOSW="wifi wwan"
Radio devices to enable when wireless radio switch is turned on.
Hint: this feature is only available for ThinkPads with a slide switch (not Fn+F5!) running Ubuntu.

Battery Charge Thresholds

ThinkPads only
START_CHARGE_THRESH_BAT0=75
STOP_CHARGE_THRESH_BAT0=80

START_CHARGE_THRESH_BAT1=75
STOP_CHARGE_THRESH_BAT1=80
Set ThinkPad battery charge thresholds for main battery (BAT0) and auxiliary/Ultrabay battery (BAT1). Values are given as a percentage of the full capacity.
Charging starts upon connecting AC power, but only if the remaining capacity is below the value of START_CHARGE_TRESH (lower threshold). Charging stops when reaching the STOP_CHARGE_TRESH (upper threshold) value. If, however when you connect the AC adapter, charge is above the lower threshold, then it will not charge.
The default configuration file provides sample settings designed to minimize battery wear – the battery is charged to 80% only. However these settings are disabled by default and must be enabled explicitly by the user (remove the leading '#'). Note that even the hardware defaults of 96 / 100% – effective without TLP – already prevent battery wear by blocking short charge cycles.
Hint: the charging process is not controlled by software, but by hardware. TLP just writes the thresholds to the hardware registers (via tp-smapi or tpacpi-bat).
DISABLE_TPACPIBAT=1
Disable use of tpacpi-bat – and use tp-smapi instead – for setting the charge thresholds on Sandy Bridge models (X220, T420 et al.) .
Hint: do not use this option with Ivy Bridge models (X230, T430 et al.) where tpacpi-bat is mandatory because tp-smapi does not work.
For further questions concerning battery thresholds consult the TLP FAQ.

Radio Device Wizard

The radio device wizard provides the capability to enable or disable builtin radio devices triggered by certain events. In Ubuntu and Debian it is implemented in the (optional) package tlp-rdw.
Hint: the radio device wizard needs Network Manager as a prerequisite.

Disable on Network Connect

DEVICES_TO_DISABLE_ON_LAN_CONNECT="wifi wwan"
DEVICES_TO_DISABLE_ON_WIFI_CONNECT="wwan"
DEVICES_TO_DISABLE_ON_WWAN_CONNECT="wifi"
Upon a lan, wifi or wwan connect the stated radio devices are disabled:
  • bluetooth
  • wifi – Wireless LAN
  • wwan – Wireless Wide Area Network (UMTS)
Multiple devices are separated with blanks.

Enable on Network Disconnect

DEVICES_TO_ENABLE_ON_LAN_DISCONNECT="wifi wwan"
DEVICES_TO_ENABLE_ON_WIFI_DISCONNECT=""
DEVICES_TO_ENABLE_ON_WWAN_DISCONNECT=""
Upon a lan, wifi or wwan disconnect the stated radio devices are enabled.

Enable/Disable on Dock

DEVICES_TO_ENABLE_ON_DOCK=""
DEVICES_TO_DISABLE_ON_DOCK=""
After docking the stated radio devices are enabled/disabled.

Enable/Disable on Undock

DEVICES_TO_ENABLE_ON_UNDOCK="wifi"
DEVICES_TO_DISABLE_ON_UNDOCK=""
After undocking the stated radio devices are enabled/disabled.

Trace Mode

For support purposes TLP provides a trace mode. To enable it add the following line to the configuration file:
TLP_DEBUG="lock nm path pm rf run sysfs udev usb"

Default Configuration

For reference see /etc/default/tlp as contained in the installation package.
That's it
Source: TLP
http://www.noobslab.com/
http://linrunner.de/

Thứ Hai, 24 tháng 2, 2014

How to Enable Hibernation in Ubuntu 13.10

I’ve written a post about how to enable hibernate option in previous Ubuntu releases. Ubuntu 13.10 is a little different, so I write this tutorial to teach how to enable this feature in Saucy Salamander. Hope it helps!
Hibernate is disabled by default in Ubuntu, when the computer hibernates, all of your applications and documents are stored and the computer completely switches off so it does not use any power, but the applications and documents will still be open when you switch on the computer again.
hibernate ubuntu 13.10

Test if hibernate works

Before getting started, press Ctrl+ALt+T on your keyboard to open terminal. When it opens, run:
sudo pm-hibernate
After you computer turns off, switch it back on. Did your open applications re-open? If hibernate doesn’t work, check if your swap partition is at least as large as your available RAM.

Enable Hibernate

The indicator-session was updated to use logind instead of upower. Hibernate is disabled by default in both upower and logind.
To re-enable hibernate, run below command to edit the config file:
sudo gedit /var/lib/polkit-1/localauthority/50-local.d/com.ubuntu.enable-hibernate.pkla
Copy and paste below lines into the file and save it.
[Re-enable hibernate by default in upower]
Identity=unix-user:*
Action=org.freedesktop.upower.hibernate
ResultActive=yes
[Re-enable hibernate by default in logind]
Identity=unix-user:*
Action=org.freedesktop.login1.hibernate
ResultActive=yes
enable hibernate ubuntu 13.10
After reboot, the login screen session menu should have a Hibernate option.
After logged in, the desktop session menu still doesn’t have the Hibernate option.Run killall indicator-session-service and the menu will be updated with Hibernate. This is a little buggy, because you need to run this command everytime you login to get the option. If you know how to fix it, tell me and thanks!
UPDATE: Thanks to MoonShadow, here’s the method to kill indicator services at startup:
1. Go to Startup Application from Unity Dash.
2. Click Add and type in:
Name: restart indicator services
Command: sleep 60 && killall indicator-session-service


kill-indicator-services


Source: http://ubuntuhandbook.org/

Chủ Nhật, 23 tháng 2, 2014

How to correctly set the CPU frequency in Ubuntu

(NOTE: this article applies to Ubuntu 10.4 – 12.10, for any other system your mileage may vary)
This seems to be a very common problem: under Ubuntu (and many other dists), Linux runs at some fixed speed (usually max or min for the CPU) and you cannot change it. Here is how to fix it:

Lets start with some basics…

1. Install cpufreq utils
sudo apt-get install cpufrequtils
2. Uninstall cpufreqd, since it doesn’t work well with some other software
sudo apt-get remove cpufreqd
3. If you want a graphical tool, try this
sudo apt-get install indicator-cpufreq
At this point it is probably safest to restart your machine. Now, you should be able to set the CPU frequency in the UI (well, after restarting your computer or manually starting indicator-cpufreq). Or from the command line like this:
4. Set current frequency
# This first command locks the frequency to an specific value. 
sudo cpufreq-set -f 1600000     # 1.6 GHz for ever!
You can also choose a “governor”, which is an algorithm that automatically changes the CPU frequency for you:
4.B Set current governor
# This command on the other hand uses a power profile.
# ('powersave', 'performance' and 'ondemand' are common profiles). 
sudo cpufreq-set -g powersave   # set governor to powersave 
You can verify the result by running cpufreq-info (or if you’re old-school using cat /proc/cpuinfo).

… but it doesn’t work!

This sometimes doesn’t work, for one of two reasons. First, your CPU may no be “supported” by Linux. This is pretty uncommon but can actually happen if you have a very odd P4 processor. If that is the case, you are out of luck :(
A more common problem is that the upper and lower frequency limits are set wrong and need to be adjusted. To do this, you must know what frequencies the CPU actually supports. This command lists available frequencies for each CPU (CPU 0 in this example)
5. List supported frequencies
$ cat /sys/devices/system/cpu/cpu0/cpufreq/scaling_available_frequencies
3201000 3200000 3100000 3000000 2900000 2700000 2600000 2500000 
2400000 2300000 2200000 2100000 1900000 1800000 1700000 1600000
Next you need to manually adjust the frequency bounds – for each CPU. In my case, the CPU was stuck at 3.2 GHz even in powersave mode, and the reason for that was because the upper and lower frequency limits were both incorrectly set to 3.2 GHz. So I changed the lower bound to 1.6 GHz:
6. Force CPU frequency bound
$ sudo echo 1600000 >  /sys/devices/system/cpu/cpu0/cpufreq/scaling_min_freq 
# The upper limit is set by writing to scaling_max_freq.
In 12.04 and above (?), this can fail with a “permission denied” (reason: it will run echo as root but re-direct stdout with your normal permissions). Try this if that happens
6.B Force CPU frequency bound (fixed)
$ echo 1600000 | sudo tee /sys/devices/system/cpu/cpu0/cpufreq/scaling_min_freq
Repeat this scheme any time a write operation fails!
Note that you must repeat this for each CPU. You may also need to do this every time the machine reboots (?). I even had a machine that would reset this once every couple of hours so I had to ran it hourly as a cron job…

Adjusting the governor…

Once you have adjusted the frequency bounds, you can set a “governor” to adjust the current frequency automatically.
To check what governors are available, try this:
7. List available governors
$ cat /sys/devices/system/cpu/cpu0/cpufreq/scaling_available_governors
conservative ondemand userspace powersave performance
On a laptop, you probably want to use ‘powersave’. On a desktop PC, you can go with ‘ondemand’. To activate a governor, you do this:
8. Activate a governor
$ echo powersave >  /sys/devices/system/cpu/cpu0/cpufreq/scaling_governor
You can check it has taken effect by doing this:
9. Check current governor
$ cat /sys/devices/system/cpu/cpu0/cpufreq/scaling_governor
powersave
Source: http://blog.tube42.se/?p=1225